Exercise - Add parameters and decorators
Note
This exercise is optional. If you want to complete this exercise, you'll need to create an Azure subscription before you begin. If you don't have an Azure account or you don't want to create one at this time, you can read through the instructions so you understand the information that's being presented.
Note
You need to use a resource group to complete the steps in this exercise. You can use a resource group that you already created, or you can create a new resource group specifically for this exercise. If you choose to create a new resource group, that will make it easier to clean up any resources that you create as you complete the exercise. If you don't have an existing resource group or you want to create a new one specifically for this exercise, you can follow the steps in Use the Azure portal and Azure Resource Manager to manage resource groups to create a resource group by using the Azure portal, or you can follow the steps in Manage Azure resource groups by using Azure CLI to create a resource group by using the the Azure CLI.
As part of the HR application migration, you're creating a Bicep template to deploy Azure resources. In this exercise, you'll create an Azure App Service plan and App Service app. You'll apply decorators to each parameter to ensure that they'll always contain the values you expect.
During the process, you'll do the following tasks:
- Create a Bicep file that includes parameters and variables.
- Add decorators to the parameters.
- Test the deployment to ensure that the template is valid.
This exercise uses the Bicep extension for Visual Studio Code. Be sure to install this extension in Visual Studio Code.
Create a Bicep template with parameters
Open Visual Studio Code.
Create a new file called main.bicep.
Save the empty file so that Visual Studio Code loads the Bicep tooling.
You can either select File > Save As or select Ctrl+S in Windows (⌘+S on macOS). Be sure to remember where you've saved the file. For example, you might want to create a scripts folder to save it in.
Add the following content into the file. You'll deploy the template soon. Enter the content yourself instead of copying and pasting so that you can see how the tooling helps you to write your Bicep files.
param environmentName string = 'dev'
param solutionName string = 'toyhr${uniqueString(resourceGroup().id)}'
param appServicePlanInstanceCount int = 1
param appServicePlanSku object = {
  name: 'F1'
  tier: 'Free'
}
param location string = 'eastus'

var appServicePlanName = '${environmentName}-${solutionName}-plan'
var appServiceAppName = '${environmentName}-${solutionName}-app'
You're creating several parameters here, and they use a mixture of types. You're defining default values for each parameter. Some of the default values include string interpolation and the
uniqueString()function.Tip
The
uniqueString()function is useful for creating globally unique resource names. It returns a string that's the same on every deployment to the same resource group, but different when you deploy to different resource groups or subscriptions.You're also defining variables that construct the names of the Azure App Service plan and App Service app. Their values include some of the parameters you've specified. Parameter values can be overridden by the user who executes the deployment, but the values of the variables can't be overridden.
In the main.bicep file in Visual Studio Code, add the following code to the bottom of the file:
resource appServicePlan 'Microsoft.Web/serverfarms@2024-04-01' = {
  name: appServicePlanName
  location: location
  sku: {
    name: appServicePlanSku.name
    tier: appServicePlanSku.tier
    capacity: appServicePlanInstanceCount
  }
}

resource appServiceApp 'Microsoft.Web/sites@2024-04-01' = {
  name: appServiceAppName
  location: location
  properties: {
    serverFarmId: appServicePlan.id
    httpsOnly: true
  }
}
Notice that the resources use the values of the parameters you defined.
Save the changes to the file.
Add parameter descriptions
In the main.bicep file in Visual Studio Code, add the
@descriptiondecorator directly above every parameter that you created in the previous task. The parameters should look similar to this example:@description('The name of the environment. This must be dev, test, or prod.') param environmentName string = 'dev' @description('The unique name of the solution. This is used to ensure that resource names are unique.') param solutionName string = 'toyhr${uniqueString(resourceGroup().id)}' @description('The number of App Service plan instances.') param appServicePlanInstanceCount int = 1 @description('The name and tier of the App Service plan SKU.') param appServicePlanSku object = { name: 'F1' tier: 'Free' } @description('The Azure region into which the resources should be deployed.') param location string = 'eastus'Save the changes to the file.
Limit input values
Your toy company will deploy the HR application to three environments: dev, test, and prod. You'll limit the environmentName parameter to only allow those three values.
In the main.bicep file in Visual Studio Code, find the
environmentNameparameter. Insert an@alloweddecorator underneath its@descriptiondecorator. After you're finished, the parameter should look like this example:@description('The name of the environment. This must be dev, test, or prod.') @allowed([ 'dev' 'test' 'prod' ]) param environmentName string = 'dev'Notice that you're limiting the parameter value for
environmentNameparameter to onlydev,test, andprod. If more environments are added in the future, you'll need to update this list.Save the changes to the file.
Limit input lengths
Your solutionName parameter is used to generate the names of resources. You want to enforce a minimum length of 5 characters and a maximum length of 30 characters.
In the main.bicep file in Visual Studio Code, find the
solutionNameparameter. Add@minLengthand@maxLengthdecorators underneath the@descriptiondecorator. After you're finished, the parameter should look like this example:@description('The unique name of the solution. This is used to ensure that resource names are unique.') @minLength(5) @maxLength(30) param solutionName string = 'toyhr${uniqueString(resourceGroup().id)}'Save the changes to the file.
Limit numeric values
Next, you'll ensure that the appServicePlanInstanceCount parameter only allows values between 1 and 10.
In the main.bicep file in Visual Studio Code, find the
appServicePlanInstanceCountparameter. Add@minValueand@maxValuedecorators underneath the@descriptiondecorator. After you're finished, the parameter should look like this example:@description('The number of App Service plan instances.') @minValue(1) @maxValue(10) param appServicePlanInstanceCount int = 1Save the changes to the file.
Verify your Bicep file
After you've completed all of the preceding changes, your Bicep file should look like this example:
@description('The name of the environment. This must be dev, test, or prod.')
@allowed([
  'dev'
  'test'
  'prod'
])
param environmentName string = 'dev'
@description('The unique name of the solution. This is used to ensure that resource names are unique.')
@minLength(5)
@maxLength(30)
param solutionName string = 'toyhr${uniqueString(resourceGroup().id)}'
@description('The number of App Service plan instances.')
@minValue(1)
@maxValue(10)
param appServicePlanInstanceCount int = 1
@description('The name and tier of the App Service plan SKU.')
param appServicePlanSku object = {
name: 'F1'
tier: 'Free'
}
@description('The Azure region into which the resources should be deployed.')
param location string = 'eastus'
var appServicePlanName = '${environmentName}-${solutionName}-plan'
var appServiceAppName = '${environmentName}-${solutionName}-app'
resource appServicePlan 'Microsoft.Web/serverfarms@2024-04-01' = {
name: appServicePlanName
location: location
sku: {
name: appServicePlanSku.name
tier: appServicePlanSku.tier
capacity: appServicePlanInstanceCount
}
}
resource appServiceApp 'Microsoft.Web/sites@2024-04-01' = {
name: appServiceAppName
location: location
properties: {
serverFarmId: appServicePlan.id
httpsOnly: true
}
}
If it doesn't, either copy the example or adjust your template to match the example.
Deploy the Bicep template to Azure
To deploy this template to Azure, you need to sign in to your Azure account from the Visual Studio Code terminal. Be sure you've installed the Azure CLI tools.
On the Terminal menu, select New Terminal. The terminal window usually opens in the lower half of your screen.
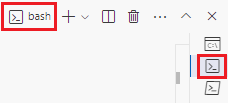
If the terminal window displays bash on the right side, it means the correct shell is already open. Alternatively, if you see a bash shell icon on the right, you can select it to launch the shell.
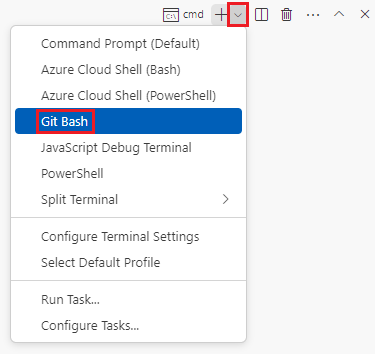
If a shell other than bash appears, select the shell dropdown arrow, and then select Git Bash.
In the terminal, go to the directory where you saved your template. For example, if you saved your template to the templates folder, you can use this command:
cd templates
Install Bicep
Run the following command to ensure you have the latest version of Bicep:
az bicep install && az bicep upgrade
Sign in to Azure by using Azure CLI
In the Visual Studio Code terminal, sign in to Azure by running the following command:
az loginIn the browser that opens, sign in to your Azure account.
The Visual Studio Code terminal displays a list of the subscriptions associated with this account.
In the list, find the subscription that you want to use for this exercise.
If you missed the list from the sign-in, you can use the following snippet to list your subscriptions again.
az account list --output tableSet the default subscription for all the Azure CLI commands that you run in this session.
az account set --subscription "Your Subscription Name or ID"
Deploy the template to Azure by using the Azure CLI
Run the following code from the terminal in Visual Studio Code to deploy the Bicep template to Azure. You don't need to specify the parameter values because they have default values specified. This process can take a minute or two to complete, and then you'll see a successful deployment.
az deployment group create --name main --template-file main.bicep
You'll see Running... in the terminal.
To deploy this template to Azure, sign in to your Azure account from the Visual Studio Code terminal. Be sure you've installed Azure PowerShell.
On the Terminal menu, select New Terminal. The terminal window usually opens in the lower half of your screen.
If the terminal window displays pwsh or powershell on the right side, it means the correct shell is already open. Alternatively, if you see a PowerShell shell icon on the right, you can select it to launch the shell.

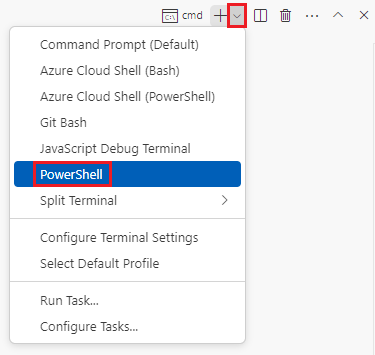
If a shell other than pwsh or powershell appears, select the shell dropdown arrow, and then select PowerShell.
In the terminal, go to the directory where you saved your template. For example, if you saved your template in the templates folder, you can use this command:
Set-Location -Path templates
Install the Bicep CLI
To use Bicep from Azure PowerShell, install the Bicep CLI.
Sign in to Azure by using Azure PowerShell
In the Visual Studio Code terminal, sign in to Azure by running the following command:
Connect-AzAccountIn the browser that opens, sign in to your Azure account.
Get the ID of the subscription that you want to use for this exercise by running the following command:
Get-AzSubscriptionThe subscription ID is the second column. Copy the second column. It looks something like aaaa0a0a-bb1b-cc2c-dd3d-eeeeee4e4e4e.
Set the default subscription for all the Azure PowerShell commands that you run in this session.
Set-AzContext -SubscriptionId {Your subscription ID}
Deploy the template to Azure by using PowerShell
Deploy the template to Azure by using the following Azure PowerShell command in the terminal. You don't need to specify the parameter values because they have default values specified. This process can take a minute or two to complete, and then you'll see a successful deployment.
New-AzResourceGroupDeployment -Name main -TemplateFile main.bicep
Verify your deployment
Go to the Azure portal and make sure you're in the correct subscription.
On the left-side panel, select Resource groups.
Select your resource group name.
In Overview, you can see that one deployment succeeded.

Select 1 Succeeded to see the details of the deployment.

Select the deployment called main to see what resources were deployed, and then select Deployment details to expand it. In this case, there's an App Service plan and app.

On the left menu, select Inputs.

Notice that the parameters and their values are listed.

Leave the page open in your browser. You'll check on deployments again later.