Note
Access to this page requires authorization. You can try signing in or changing directories.
Access to this page requires authorization. You can try changing directories.
You can check the Azure credit balance for your billing account for a Microsoft Customer Agreement in the Azure portal or through REST APIs.
In the billing account for a Microsoft Customer Agreement, credits are assigned to a billing profile. Each billing profile has its own credits that are automatically applied to the charges on its invoice. To view the Azure credit balance for a billing profile, you must have one of these roles:
- Owner, contributor, reader, or invoice manager role on the billing profile
- Owner, contributor, or reader role on the billing account
To learn more about the roles, see Understand Microsoft Customer Agreement administrative roles in Azure.
Note
New credit can take up to 24 hours to appear in the Azure portal.
This article applies to a billing account for a Microsoft Customer Agreement. Check if you have access to a Microsoft Customer Agreement.
How credits are used
In a billing account for a Microsoft Customer Agreement, you use billing profiles to manage your invoices and payment methods. A monthly invoice is generated for each billing profile, and you use the payment methods to pay the invoice.
Credits that you acquire are assigned to a billing profile. When an invoice is generated for the billing profile, credits are automatically applied to the total charges to calculate the amount that you need to pay. You pay the remaining amount by using payment methods like check, wire transfer, or credit card.
Products and services that Azure credits don't cover
Azure credits don't apply to certain products and services. Any usage of these offerings is billed separately and charged regardless of your available Azure credit balance.
In general, Azure credits don't cover:
- Partner-provided products or services, along with non-Microsoft products on Microsoft Marketplace.
- Azure support plans.
- Software subscriptions or licenses that aren't billed as Azure consumption.
In addition to those general limitations, Azure Sponsorship credits don't cover:
- Entitlement-based purchases, even when Azure sells those offerings directly (for example, savings plans or reserved instances).
For AI models:
- Azure Sponsorship credits might cover models that Azure sells directly.
- Azure Sponsorship credits don't cover models from partners and the community.
Check your credit balance
Sign in to the Azure portal.
In the search box, enter cost management + billing.
Under Services, select Cost Management + Billing.

On the Billing scopes pane, select the billing account for which you want to track the credit balance. The billing account should be of type Microsoft Customer Agreement.

Note
The Azure portal remembers the last billing scope that you access and displays the scope the next time you open the list of billing scopes. You don't see the Billing scopes pane if you visited Cost Management + Billing earlier. If so, check that you're in the right scope. If not, switch the scope to select the billing account for a Microsoft Customer Agreement.
Go to Billing > Payment methods, and then select the Azure credits tab.

Check the following items:
Available balance. This area shows available credits after your last invoice. This list includes all active credits only and excludes any expired or future credits. When your available balance drops to zero, you're charged for all your usage, including products that are eligible for credits.
Credit Details. View a list of all credits with details.
Term Definition Source Acquisition source of the credit. Effective date Date when you acquired the credit. Expiration date Date when the credit expires. Original amount Original amount of the credit. Balance Credit balance after the latest invoice. Status Current status of the credit. The status can be Active, Used, Expired, or Expiring. Note
If Azure credits don't appear, either you don't have credits or you didn't select the right scope. Select the billing account that has credits or one of its billing profiles. To learn how to change scopes, see Switch billing scope in the Azure portal.
View all transactions. Select this link to open a pane that displays all transactions that affected your credit balance.

Term Definition Date Date when the transaction happened. Description Description of the transaction. Amount Amount of the transaction.
If you're viewing Azure credits at the billing account scope and the billing account has more than one billing profile, the Azure credits tab shows a table with a summary of Azure credits for each billing profile. Select a billing profile from the list, select payment methods, and then select Azure credits to view details for a billing profile.

Check access to a Microsoft Customer Agreement
To determine whether you have access to a billing account for a Microsoft Customer Agreement, check the agreement type:
Go to the Azure portal. Search for and select Cost Management + Billing.

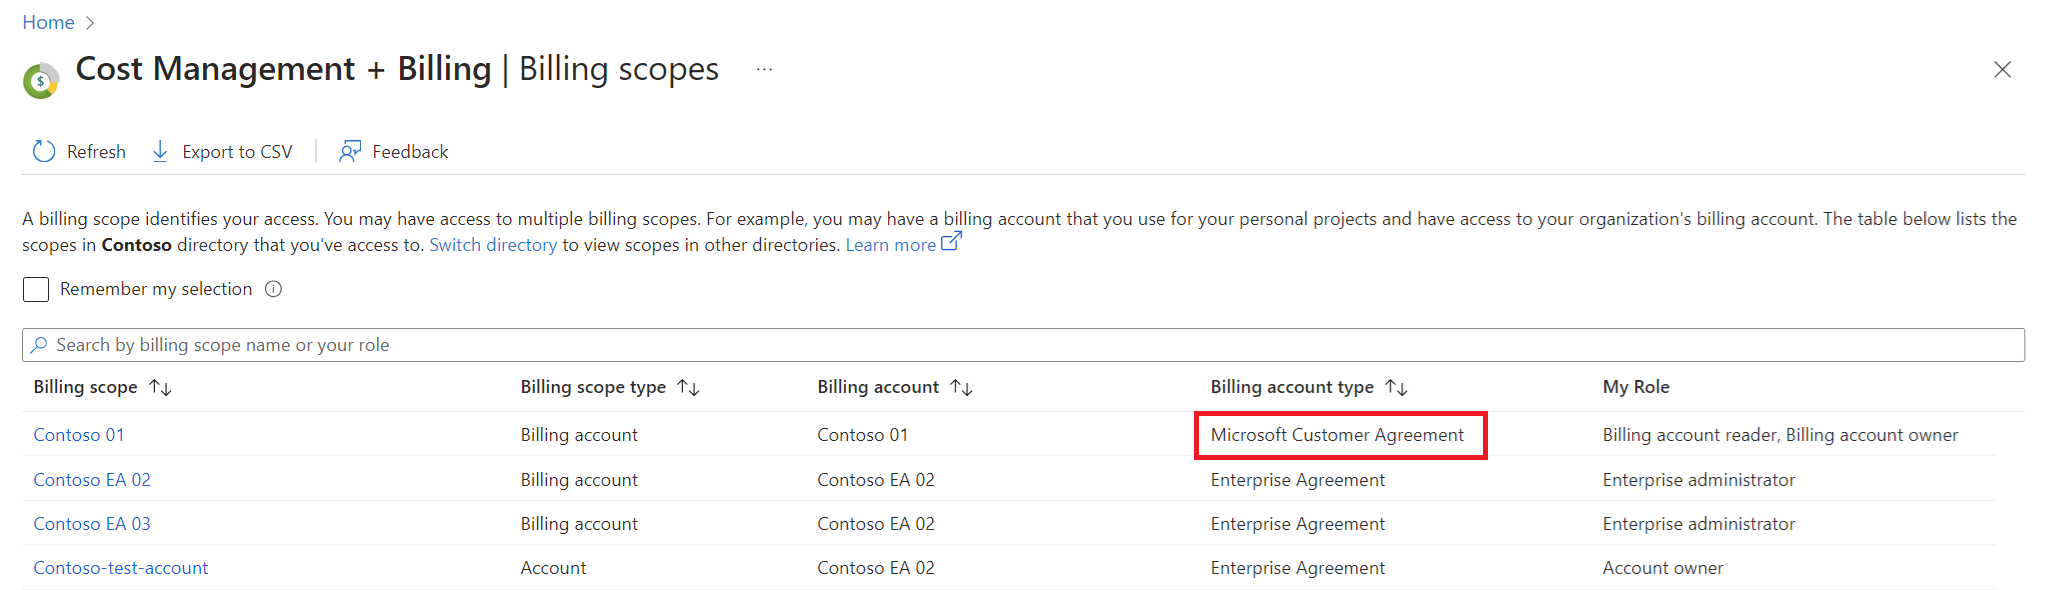
If you have access to just one billing scope, select Settings > Properties. You have access to a billing account for a Microsoft Customer Agreement if the billing account type is Microsoft Customer Agreement.

If you have access to multiple billing scopes, check the type in the Billing account type column. You have access to a billing account for a Microsoft Customer Agreement if the billing account type for any of the scopes is Microsoft Customer Agreement.


Get support
If you need help, contact support to get your issue resolved quickly.