Note
Access to this page requires authorization. You can try signing in or changing directories.
Access to this page requires authorization. You can try changing directories.
Azure Container Registry (ACR) supports Azure attribute-based access control (Azure ABAC) for managing repository permissions. This feature enhances security by enabling more granular permissions management to container registry repositories.
Azure ABAC builds upon Azure role-based access control (Azure RBAC) by introducing repository-specific conditions in role assignments. By using Azure ABAC, you can grant a security principal access to a repository resource based on attributes.
This article describes how to enable Azure ABAC for repository permissions in your container registry, the effects of changing the role assignment permissions mode, and how to configure role assignments with ABAC conditions.
Important
ABAC-enabled mode (rbac-abac) will become the default role assignment permissions mode for Azure Container Registry in the future. We recommend that all customers migrate their existing registries from RBAC-only mode to ABAC-enabled mode. You don't need to use ABAC conditions to benefit from this mode—assigning ABAC-enabled roles without conditions grants registry-wide permissions, similar to legacy roles.
Switching an existing registry to ABAC-enabled mode without first assigning equivalent ABAC-enabled roles risks cutting off access for existing identities. Legacy ACR roles such as AcrPull, AcrPush, and AcrDelete are not honored in ABAC-enabled registries. Follow the recommended migration guide to transition safely.
Configure role assignment permissions mode setting
To use Azure ABAC to manage repository permissions, set the Role assignment permissions mode for your registry to RBAC Registry + ABAC Repository Permissions. This mode allows you to use optional ABAC conditions to scope role assignments to specific repositories, in addition to RBAC role assignments by using ACR built-in roles.
You can configure the Role assignment permissions mode when creating your registry, or you can update the setting on any existing registry. You can set this configuration through the Azure portal or the Azure CLI.
If you change the setting for an existing registry, be sure to understand the effects on existing role assignments and tasks as described in the following sections.
Note
Ensure that you have the latest version of the Azure CLI installed by running the Azure CLI command az upgrade. Additionally, if you previously participated in the private preview of this feature, you might have installed a custom private preview extension to manage ACR ABAC. This custom extension is no longer needed and should be uninstalled (to avoid conflicts) by running the Azure CLI command az extension remove --name acrabac.
Effect on existing role assignments
If you configure a registry to use RBAC Registry + ABAC Repository Permissions, be aware that some existing role assignments aren't honored or have different effects. A different set of ACR built-in roles apply to ABAC-enabled registries.
For example, the AcrPull, AcrPush, and AcrDelete roles aren't honored in an ABAC-enabled registry.
Instead, in ABAC-enabled registries, use the Container Registry Repository Reader, Container Registry Repository Writer, and Container Registry Repository Contributor roles to grant either registry-wide or repository-specific image permissions.
Additionally, privileged roles such as Owner, Contributor, and Reader have different effects in an ABAC-enabled registry. In these repositories, these privileged roles grant only control plane permissions to create, update, and delete the registry itself, without granting data plane permissions to the repositories and images in the registry.
For more information on these roles, see Azure Container Registry permissions and role assignments overview. Alternatively, consult the ACR built-in roles reference for an in-depth description of each role.
Effect on ACR Tasks, Quick Tasks, Quick Builds, and Quick Runs
If you configure a registry to use RBAC Registry + ABAC Repository Permissions, new and existing ACR Tasks, as well as Quick Tasks, Quick Builds, and Quick Runs, are affected. They no longer have default data plane access to an ABAC-enabled source registry and its content.
To understand the effects of this change—and how to grant data plane access for ACR Tasks, Quick Tasks, Quick Builds, and Quick Runs in ABAC-enabled source registries—see Effects of enabling ABAC on ACR Tasks, Quick Tasks, Quick Builds, and Quick Runs.
Create a registry with ABAC enabled
You can enable Azure ABAC by using the Azure portal or the Azure CLI.
When creating a new registry through Azure portal, select RBAC Registry + ABAC Repository Permissions for Role assignment permissions mode.
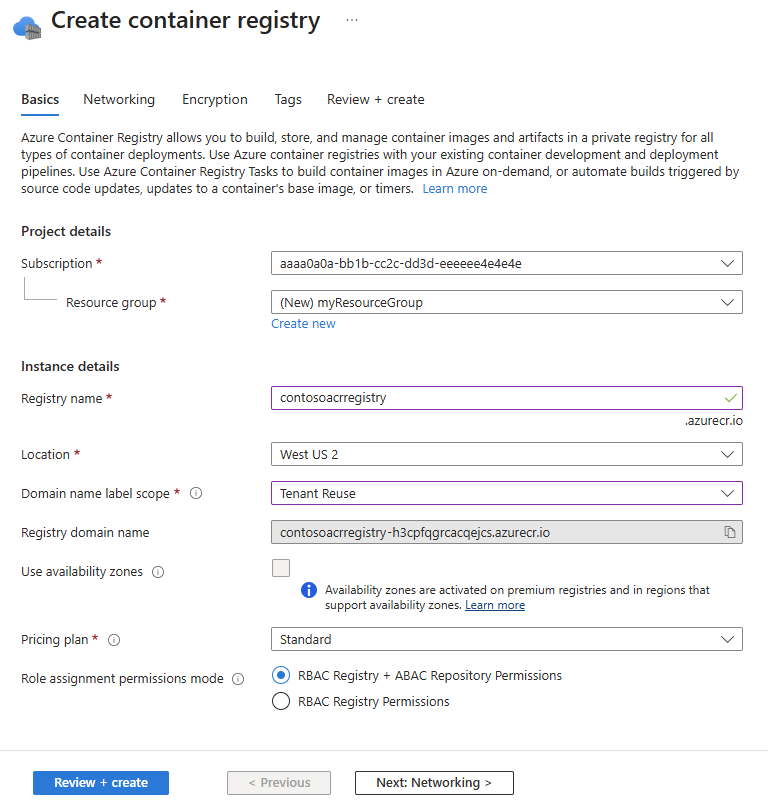
Update an existing registry to enable ABAC
Important
Changing the role assignment permissions mode of an existing registry can affect existing role assignments and tasks, as described in the previous sections. Be sure to review these effects before changing the setting.
To view the existing role assignment permissions mode of a registry, go to the registry in the Azure portal. In the service menu, under Settings, select Properties, then check the Role assignment permissions mode setting.
To enable Azure RBAC, select RBAC Registry + ABAC Repository Permissions, then select Save.
Configure Azure ABAC repository permissions
You can use either the Azure portal or Azure CLI to assign Azure ABAC conditions to scope role assignments to specific repositories.
Tip
The Azure portal supports a limited number of ABAC conditions per role assignment. To add more ABAC conditions, use the Azure CLI.
This section provides examples of how to add ABAC conditions for a specific repository, a repository prefix (wildcard), or multiple repository prefixes (multiple wildcards).
ABAC-enabled built-in roles
The following ACR built-in roles are ABAC-enabled roles. You can specify optional ABAC conditions to the following roles to scope the role assignments to specific repositories.
Container Registry Repository Reader- ABAC-enabled role that grants permissions to read images, tags, and metadata within repositories in a registry.Container Registry Repository Writer- ABAC-enabled role that grants permissions to read, write, and update images, tags, and metadata within repositories in a registry.Container Registry Repository Contributor- ABAC-enabled role that grants permissions to read, write, update, and delete images, tags, and metadata within repositories in a registry.
These roles don't support catalog listing permissions to list repositories in a registry.
To list all repositories in a registry (without granting permissions to read repository content), you must also assign the Container Registry Repository Catalog Lister role. This separate role doesn't support ABAC conditions, so it always has permissions to list all repositories in a registry.
Important
If you assign an ABAC-enabled role without ABAC conditions, the role assignment isn't scoped to repositories. This role assignment acts as a registry-wide role assignment, granting permissions to all repositories in the registry. To scope a role assignment to specific repositories, include ABAC conditions when assigning an ABAC-enabled role.
For more information on these roles, see Azure Container Registry permissions and role assignments overview and the ACR built-in roles reference.
Scope role assignment to a specific repository
This example assigns the Container Registry Repository Reader role to grant pull permissions to a single repository. By adding ABAC conditions, the role assignment lets the identity pull images, view tags, and read metadata only from the specified repository, preventing access to other repositories in the registry.
Go to the registry in the Azure portal. In the service menu, select Access control (IAM).
Select Add, and then select Add role assignment.
Search for
Container Registry Repository Reader. Select that role, and then select Next.In the Members tab, specify the identity who should be assigned this role, and then select Next.
In the Conditions tab, select Add condition.
Ensure Visual is selected for Editor type.
Under Condition #1, select the actions (permissions) belonging to this role that you want to grant in this repository-scoped role assignment. In most cases, select all actions to limit all actions performed by identities with this role to the repository scope. Choose Select to save your changes.

Next, under Build expression, select Add expression. Configure the following options for the expression to scope the ABAC condition to a specific repository:
- Attribute source:
Request - Attribute:
Repository name - Operator:
StringEqualsIgnoreCase - Value:
<repository-name>- the full name of the repository

- Attribute source:
Select Save to save the ABAC condition, and then review the code expression of the ABAC condition. You can use this code to perform the same role assignment with the same ABAC condition by using the Azure CLI.
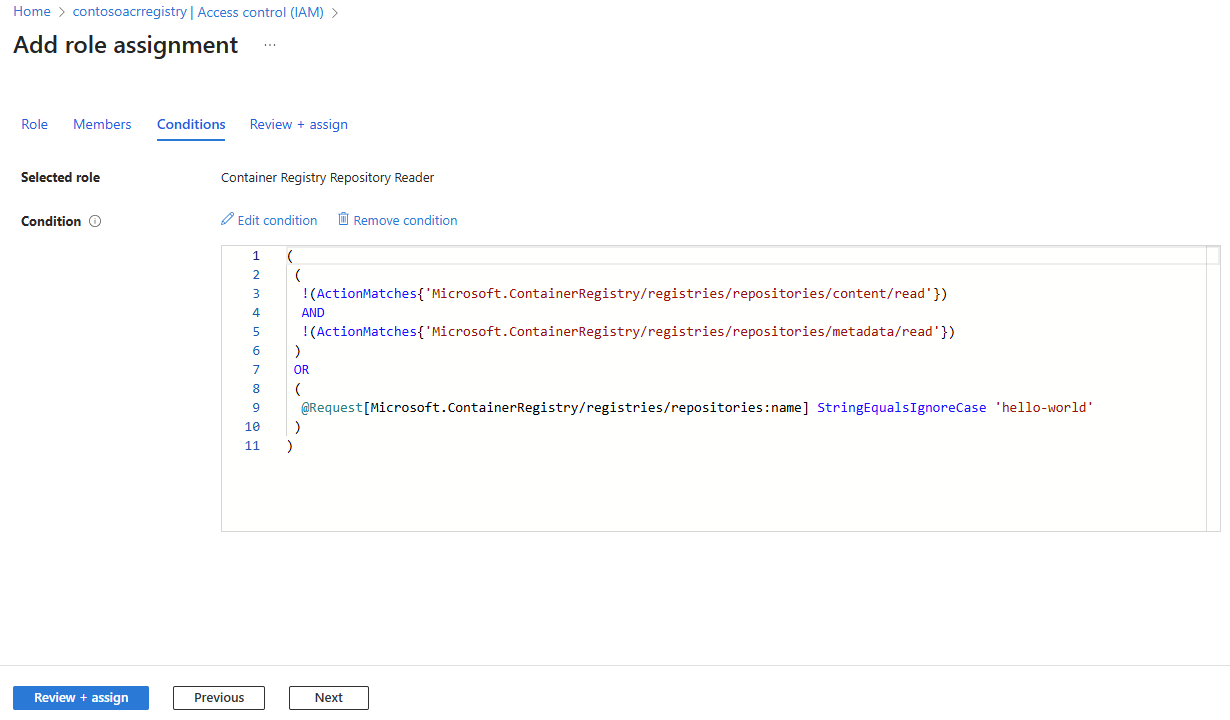
Select Review + assign to finalize the role assignment.


After you create the role assignment, you can view, edit, or delete it in the Access control (IAM) page for your registry by selecting Role assignments.
Scope role assignment to multiple repositories using repository prefix (wildcard)
In this example, you assign the Container Registry Repository Reader role to grant pull permissions to multiple repositories with a common prefix (wildcard). By adding ABAC conditions, this role assignment lets the identity pull images, view tags, and read metadata only from the repositories with a common prefix, while preventing access to other repositories in the registry.
If you followed the previous example to assign the Container Registry Repository Reader role to a specific repository, delete that role assignment before you create a new one. You can delete the assignment in Access control (IAM) by selecting Role assignments, selecting the role assignment, and then selecting Delete.
Follow the same steps as in the previous example to perform a role assignment with ABAC conditions.
In the step to add an expression for the ABAC condition, configure an expression for an ABAC condition to scope the role assignment to multiple repositories with a common prefix (wildcard). Configure the following options:
Attribute source:
RequestAttribute:
Repository nameOperator:
StringStartsWithIgnoreCaseValue:
<repository-prefix>- the prefix of the repositories, including the trailing slash/. For example, to grant permissions to all repositories with the prefixbackend/, such asbackend/nginxandbackend/redis, enterbackend/. To grant permissions to all repositories with the prefixfrontend/js/, such asfrontend/js/reactandfrontend/js/vue, enterfrontend/js/.Important
The trailing slash
/is required in theValuefield for the expression of the ABAC condition. If you don't include the trailing slash/, you might unintentionally grant permissions to other repositories that don't match the prefix. For example, if you enterbackendwithout the trailing slash/, the role assignment grants permissions to all repositories with the prefixbackend, such asbackend/nginx,backend/redis,backend-infra/k8s,backend-backup/store,backend, andbackendsvc/containers.
Select Save to save the ABAC condition, then review the code expression of the ABAC condition.
Select Review + assign to finalize the role assignment.
Scope role assignment to multiple repositories using multiple repository prefixes (multiple wildcards)
In this example, you assign the Container Registry Repository Reader role to grant pull permissions to multiple repositories under two different prefixes (multiple wildcards).
By adding ABAC conditions, this role assignment lets the identity pull images, view tags, and read metadata only from the specified repositories, preventing access to other repositories in the registry.
If you followed the previous example to assign the Container Registry Repository Reader role to a specific repository prefix, delete that role assignment before you create a new one. You can delete the assignment in Access control (IAM) by selecting Role assignments, selecting the role assignment, and then selecting Delete.
Follow the same steps as in the first example to perform a role assignment with ABAC conditions.
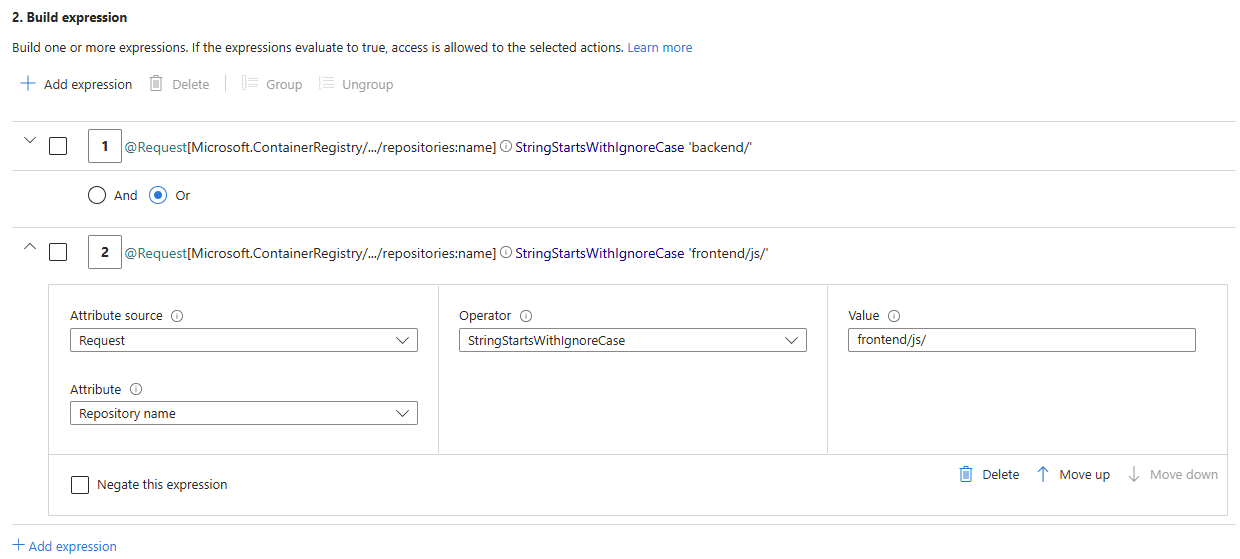
In the step to add an expression for the ABAC condition, configure two expressions to scope the role assignment to multiple repositories under two prefixes:
backend/andfrontend/js/(multiple wildcards). Include the trailing slash/in each prefix.For the first expression, configure the following options:
- Attribute source:
Request - Attribute:
Repository name - Operator:
StringStartsWithIgnoreCase - Value:
backend/
- Attribute source:
Select Add expression. The visual editor also supports multiple boolean operators including And, Or, hierarchical grouping, and negation. For this example, ensure that the boolean operator is set to Or.
For the second expression, configure the following options:
- Attribute source:
Request - Attribute:
Repository name - Operator:
StringStartsWithIgnoreCase - Value:
frontend/js/
- Attribute source:
Select Save to save the ABAC condition, then review the code expression of the ABAC condition.
Select Review + assign to finalize the role assignment.

Effects of enabling ABAC on ACR Tasks, Quick Tasks, Quick Builds, and Quick Runs
When you enable Azure ABAC for repository permissions in your container registry by setting the Role assignment permissions mode to RBAC Registry + ABAC Repository Permissions, new and existing ACR Tasks, as well as Quick Tasks, Quick Builds, and Quick Runs, are affected. Review the following sections to understand these effects and how to grant data plane access for these tasks in ABAC-enabled source registries.
Effect on ACR Tasks
When you configure a registry with "RBAC Registry + ABAC Repository Permissions", new and existing ACR Tasks no longer have default data plane access to the source registry, including its images and artifacts within repositories.
You must explicitly attach and set an identity for new and existing ACR Tasks to use for authentication to an ABAC-enabled source registry. Then, grant the attached identity the appropriate ACR built-in role to enable authentication and access to registry repositories.
Attach an identity to a new ACR Task for source registry access
For ABAC-enabled source registries, use az acr task create with the --source-acr-auth-id flag to specify the identity the Task uses to authenticate to the source registry.
You can specify one of the following options for the --source-acr-auth-id flag:
--source-acr-auth-id [system]– Attaches a system-assigned managed identity.--source-acr-auth-id $resourceId– Attaches a user-assigned managed identity by using its resource ID.
Once you attach the identity, assign it an ACR built-in role (optionally with ABAC conditions) to grant appropriate permissions.
Update an existing ACR Task to use an identity for source registry access
For ABAC-enabled source registries, use az acr task update with the same --source-acr-auth-id options to assign or change the identity the Task uses to authenticate to the source registry. As with new Tasks, follow up with the appropriate role assignment.
Remove source registry access from an ACR Task
To explicitly prevent an ACR Task from authenticating by using an ABAC-enabled source registry and block the Task's permissions to the source registry, set --source-acr-auth-id none. This action disables the task's ability to perform any operations on the source registry and content within it.
Note
Note: The --auth-mode flag is deprecated for ABAC-enabled registries and is no longer supported for controlling ACR Task access.
Effect on Quick Tasks, Quick Builds, and Quick Runs
When you configure a registry with "RBAC Registry + ABAC Repository Permissions", new Quick Tasks such as Quick Builds and Quick Runs no longer have default data plane access to the source registry, including its images and artifacts within repositories. For Quick Tasks, you must use the caller's identity to authenticate the Quick Task to the source registry. The caller's identity must have the appropriate ACR built-in role to enable authentication and access to registry repositories.
Run a Quick Task with the caller identity for source registry access
For ABAC-enabled source registries, use az acr build or az acr run with the --source-acr-auth-id [caller] option to specify the caller's identity as the identity the Quick Task uses to authenticate to the source registry. Before running the Quick Task, ensure that the caller's identity has the appropriate ACR built-in role to enable authentication and access to the source registry and its repositories.
Run a Quick Task without source registry access
To run a Quick Task without any source registry access, use az acr build or az acr run with the --source-acr-auth-id none option. This setting disables the Quick Task's ability to perform any operations on the source registry and content within it.
Migrate from RBAC-only to ABAC-enabled mode
If you have an existing registry using RBAC-only mode (RBAC Registry Permissions), you should migrate to ABAC-enabled mode (RBAC Registry + ABAC Repository Permissions). Enabling ABAC doesn't require you to use ABAC conditions—you can assign ABAC-enabled roles without conditions to grant registry-wide permissions equivalent to the legacy roles.
Caution
Switching an existing registry to ABAC-enabled mode without first assigning equivalent ABAC-enabled roles risks cutting off access for existing identities. Legacy ACR roles such as AcrPull, AcrPush, and AcrDelete are not honored in ABAC-enabled registries. You must follow the recommended transition plan below to avoid access disruptions.
Recommended transition plan
Follow these steps to safely migrate an existing registry from RBAC-only mode to ABAC-enabled mode without interrupting access for existing identities:
Step 1: Keep the registry in RBAC-only mode
Don't change the role assignment permissions mode yet. Leave the registry in RBAC Registry Permissions mode while you prepare the new role assignments.
Step 2: Assign the equivalent ABAC-enabled roles
For each identity (user, group, service principal, or managed identity) that currently has a legacy role assignment, create an additional role assignment using the equivalent ABAC-enabled role without ABAC conditions. Assigning the role without conditions grants registry-wide access, which is equivalent to the legacy role.
The following table maps legacy ACR roles to their ABAC-enabled equivalents:
| Legacy role (RBAC-only) | Equivalent ABAC-enabled role(s) |
|---|---|
AcrPull |
Container Registry Repository Reader + Container Registry Repository Catalog Lister |
AcrPush |
Container Registry Repository Writer |
AcrDelete |
Container Registry Repository Contributor |
The ABAC-enabled roles don't include catalog listing permissions to list repositories, so you must also assign the Container Registry Repository Catalog Lister role to maintain equivalent access.
For example, if an identity or group currently has an AcrPull role assignment (which allows pull and repository list permissions), create additional role assignments with the Container Registry Repository Reader role (without any ABAC conditions) and the Container Registry Repository Catalog Lister role.
Assign the equivalent role using the Azure portal
- Go to the registry in the Azure portal. In the service menu, select Access control (IAM).
- Select Add, and then select Add role assignment.
- Search for the equivalent ABAC-enabled role (for example,
Container Registry Repository Reader). Select that role, and then select Next. - Select the identity (user, group, service principal, or managed identity) that currently has the legacy role. Select Next.
- On the Conditions tab, don't add any conditions. Select Next, then select Review + assign.
Assign the equivalent role using the Azure CLI
# Example: Assign the equivalent of AcrPull by assigning the roles as per the table
az role assignment create \
  --assignee <principal-id-or-group-object-id> \
  --role "Container Registry Repository Reader" \
  --scope /subscriptions/<subscription-id>/resourceGroups/<resource-group>/providers/Microsoft.ContainerRegistry/registries/<registry-name>

az role assignment create \
  --assignee <principal-id-or-group-object-id> \
  --role "Container Registry Repository Catalog Lister" \
  --scope /subscriptions/<subscription-id>/resourceGroups/<resource-group>/providers/Microsoft.ContainerRegistry/registries/<registry-name>
Step 3: Switch the registry to ABAC-enabled mode
After you've assigned the equivalent ABAC-enabled roles to all existing identities, transition the registry to ABAC-enabled mode.
In the Azure portal, go to the registry. In the service menu, under Settings, select Properties. Change the Role assignment permissions mode to RBAC Registry + ABAC Repository Permissions, and then select Save.
Step 4: Confirm uninterrupted access
Before removing any legacy role assignments, verify that all identities continue to have the expected access with the new ABAC-enabled roles. For example:
- Verify that Kubernetes clusters can still pull images from the registry.
- Verify that CI/CD pipelines can still push images to the registry.
- Verify that any other automated processes that interact with the registry continue to work.
If any identity loses access, check the role assignments and verify that the correct ABAC-enabled role is assigned before proceeding.
Step 5: Remove the legacy role assignments
After you've confirmed the ABAC-enabled roles are correctly assigned and the registry is in ABAC-enabled mode, remove the legacy role assignments (for example, AcrPull, AcrPush, AcrDelete) to clean up.
Remove the legacy role using the Azure CLI
# Example: Remove the legacy AcrPull role assignment
az role assignment delete \
  --assignee <principal-id-or-group-object-id> \
  --role "AcrPull" \
  --scope /subscriptions/<subscription-id>/resourceGroups/<resource-group>/providers/Microsoft.ContainerRegistry/registries/<registry-name>
Step 6: Validate that identities have uninterrupted access
After removing the legacy role assignments, perform a final validation to confirm that all identities still have the expected access using only the ABAC-enabled roles.
Related content
- For an overview of built-in roles, see Azure Container Registry permissions and role assignments overview.
- For a detailed reference of every ACR built-in role, including the permissions granted by each role, see the Azure Container Registry roles directory reference.
- For information on creating custom roles that meet your specific needs and requirements, see Azure Container Registry custom roles.